Kamis, 02 Desember 2010

CCNA 2 Labskill 6.1.5

Lab 6.1.5 Configure and Verify RIP
Step 1: Build the network and configure the routers
Step 2: Check the routing table entries
a.       View the IP routing table for R1 using the show ip route command:
b.      What is the significance of the “C” to the left of the 172.16.0.0 and 172.17.0.0 network entries in the routing table?  Pada IP 172.16.0.0 menggunakan interface type DCE sedangkan pada IP 172.17.0.0 menggunakan interface type DTE.
Step 3: Configure the routing protocol of the routers
Step 4: Configure the hosts with the proper IP address, subnet mask, and default gateway
a.       Configure the host attached to R1 with an IP address, subnet mask and default gateway that is compatible with the IP address of the Fast Ethernet interface (172.16.0.0).
b.       Configure the host attached to R2 with an IP address, subnet mask and default gateway that is compatible with the IP address of the Fast Ethernet interface (172.18.0.0).
c.        Verify that the internetwork is functioning by pinging the Fast Ethernet interface of the other router.
d.       From the host attached to R1, is it possible to ping the R2 router Fast Ethernet interface? Ya mungkin  karena sudah menggunakan gateway yang akan menghubungkan dua buah jaringan yang berbeda.
e.        From the host attached to R2, is it possible to ping the R1 router Fast Ethernet interface? Ya mungkin  karena sudah menggunakan gateway yang akan menghubungkan dua buah jaringan yang berbeda.
f.        If the answer is no for either question, troubleshoot the router configurations to find the error. Then do the pings again until the answer to both questions is yes. Be sure to check physical cabling for problems and bad connections and make sure that you are using the correct cable types.
Step 5: Show the routing tables for each router
a.        In enable or privileged EXEC mode, examine the routing table entries using the show ip route command on router R1.
b.       What are the entries in the R1 routing table? R1 terkoneksi pada jaringan 172.17.0.0/16 dan 172.16.0.0/16
c.        What is the significance of the “R” to the left of the 172.18.0.0 network entry in the routing table? 172.18.0.0 terhubung ke jaringan melalui 172.17.0.2
d.       What does “via 172.17.0.2” mean for this network route? Router mempelajari melalui RIP dengan device 172.17.0.2
e.        What does “Serial0/0” mean for this network route? Serial interfacenya atau port/slot
f.        Examine the routing table entries using the show ip route command on router R1.
g.        What are the entries in the R2 routing table? 172.16.0.0/16
Step 6: Use debug to observe RIP communications
a.       On router R1, enter the debug ip rip command from privileged EXEC mode. Examine the exchange of routes between the two routers. The output should look similar to that shown here.
b.       Enter the command undebug all to stop all debugging activity
c.        What interface does router R1 send and receive updates through? R1 mengirim ke alamat 224.0.0.9 dan R1 menerima dari 172.17.0.2
d.       Why does the route to 172.17.0.0 have metric of 1 and the route to 172.18.0.0 have a metric of 2? Karena pada ruter ke 172.17.0.0 memiliki satu lompatan atau terkoneksi langsung sehingga disebut 1 metric sedangkan 172.18.0.0 memiliki dua lompatan karena tidak terkoneksi secara langsung melainkan melalui router lain.
e.        Log off by typing exit and turn off the router.
Step 7: Reflection
a.       What do you think would happen to the routing table on router R1 if the Ethernet network on router R2 went down? Koneksi antara R1 dan R2 akan terputus
b.      What do you think would happen if router R1 was configured to run RIPv1, and R2 was configured to run RIPv2? Maka router dapat berkomunikasi dengan router lain sehingga dapat menetukan jalan yng terbaik dalam pengiriman paket data  tanpa memperhatikan subnet, konfigurasi ini di butuh kan untuk proses routing untuk menentukan interface mana yang akan mengirim data atau menerima.
CCNA 2 Labskill 6.1.2

Lab 6.1.2 Creating a Network Diagram From Routing Tables
Step 1:Examine the routing table entries for the router R1
a.       Examine show ip route output from router R1 shown below
b.      How many networks does router R1 know about? Lima networks
c.       How many networks are directly connected to this router? Tiga networks
d.      How many networks have been learned from another router? Dua network
e.       Using the codes at the beginning of the show ip route output what does the ‘R’ mean? R adalah router
f.       In the routers learned via RIP to which device does the ip address 172.17.0.2 belong? Ya ada
a.       In the routers learned via RIP to which device is serial 0/0 referring and what does it mean? 0/0 adalah interfacenya yaitu menampilkan informasi khusus hardware interface. Perintah ini harus di-set termasuk nomor port/slot dari interface serial.
Step 2: Examine the routing table entries for the router R2
b.      Examine show ip route output from router R2 shown below
c.       How many networks does router R2 know about? Lima networks
d.      How many networks are directly connected to this router? Tiga networks
e.       How many networks have been learned from another router? Dua networks
f.       Using the codes at the beginning of the show ip route output what does the ‘R’ mean? R adalah router
g.      In the routers learned via RIP to which device does the ip address 172.17.0.2 belong? Ya ada
h.      In the routers learned via RIP to which device is serial 0/0 referring and what does it mean? Serial 0/0 adalah interface –nya yaitu menampilkan informasi khusus hardware interface. Perintah ini harus di-set termasuk nomor port/slot dari interface serial.
Step 3: document router interfaces and IP addresses
a.       Based on the shown ip router output from R1 and R2
Device
interface
IP Address
Subnet mask (dotted decimal and/xx)
R1
0/0
172.17.0.0
255.255.0.0/16
R1
0/0
192.168.1.0
255.255.255.0/24
R1
0/1
192.168.2.0
255.255.255.0/24
R2
0/0
172.17.0.0
255.255.0.0/16
R2
0/0
192.168.3.0
255.255.255.0/24
R2

192.168.4.0
255.255.255.0/24
b.      In this example can the exact IP address of all router interface be determined by looking at the routing tables? Ya bisa
c.       Which router interface IP address can be determined from the routing tables? Interface 0/0 dan 0/1
Step 4: create a network topology diagram
Step 5: reflection
a.       What do you think would happen to the entries in the routing table on R1 if one of the enthernet networks on R2 was disconnected? Maka pemrosesan sinyal untuk data jaringan computer akan terputus atau tidak akan terjadi.
b.      What do you think would happen to the entries in the routing tables on R1 and R2 if the serial interface on R2 was shut down?

CCNA 2 Labskill 4.2.4

Lab 4.2.4 Determining PAT Translations
  1. Klien pada jaringan pribadi mengirimkan permintaan ke server web di Internet publik.\
  2. NAT router menerjemahkan alamat sumber dan meneruskan permintaan ke web server
  3. web server merespon ke alamat klien diterjemahkan
  4. Router NAT menerjemahkan alamat klien (tujuan) kembali ke alamat pribadi asli
Tujuan
  • Menjelaskan koneksi jaringan yang aktif terbuka pada komputer saat melihat halaman web tertentu.
  • Menentukan apa alamat IP internal dan nomor port dijabarkan ke menggunakan alamat port translation (PAT).
Latar Belakang / Persiapan
Alamat port translation (PAT) adalah bentuk network address translation (NAT). Dengan PAT, router menerjemahkan beberapa internal (biasanya swasta) alamat ke alamat IP tunggal umum pada antarmuka yang tersambung ke Internet. nomor Port yang digunakan, dalam kombinasi dengan alamat IP, untuk melacak individu koneksi. Pada lab ini, Anda menggunakan perintah ipconfig dan netstat untuk melihat port yang terbuka pada komputer. Anda akan dapat melihat alamat IP awal dan kombinasi pelabuhan, dan menentukan diterjemahkan kombinasi alamat IP dan port. Sumber berikut diperlukan:
  • Komputer menjalankan Windows XP Professional
  • Koneksi ke router gateway atau ISR yang menggunakan PAT
  • Koneksi internet
  • Akses ke prompt perintah PC.
Langkah 1: Tentukan alamat IP komputer
  1. Buka jendela Command Prompt dengan mengklik Start> Run dan ketik cmd. Atau, Anda mungkinmklik Start> All Program> Accessories> Command Prompt. Pada tipe, prompt ipconfig perintah untuk menampilkan alamat IP dari komputer.
  2. Apa alamat IP dari komputer? Apakah ada nomor port yang ditampilkan, dan mengapa atau mengapa tidak?  Jawaban: Alamat IP seperti yang ditunjukkan untuk adapter aktif pada komputer Tidak ada nomor port akan ditampilkan, karena nomor port berhubungan dengan koneksi aktif antara proses pada beberapa perangkat.
Langkah 2: Tentukan alamat IP dari router gateway atau ISR
Periksa dengan instruktur Anda untuk mendapatkan alamat IP untuk gateway NAT ISR router.
Internal Ethernet Alamat:
Eksternal alamat Internet:
Langkah 3: Hasil baseline Tampilan netstat
  1. Pada command prompt, ketik perintah netstat-n.
  2. Apa jenis informasi yang tidak kembali perintah netstat-n? Jawaban: Aktif informasi Koneksi ditampilkan: Protokol, Lokal Alamat, Alamat Asing, Negara. IP alamat dan nomor port akan ditampilkan.
  3. Mana alamat IP yang ditemukan pada Langkah 1 muncul? Apakah ada nomor port yang terkait dengan itu? Mengapa atau mengapa tidak? Jawaban: Perintah netstat menunjukkan alamat IP lokal pada kolom Alamat Lokal. Port number mungkin atau mungkin tidak akan ditampilkan tergantung pada koneksi aktif saat ini. Catatan: Jika komputer telah diam selama beberapa saat dan tidak ada koneksi jaringan baru-baru ini dilakukan, mungkin tidak menunjukkan entri atau hanya menampilkan alamat loopback dan nomor port di Lokal dan Asing Kolom alamat (misalnya 127.0.0.1:1039)
Langkah 4: Tampilkan koneksi jaringan aktif
  1. Ping alamat www.cisco.com dan mencatat.
  2. Buka web browser dan masukkan www.cisco.com di address bar.
  3. Kembali ke jendela Command Prompt. Ketik perintah netstat-n lagi, dan kemudian ketik
    perintah tanpa opsi-n. Outputnya terlihat mirip dengan gambar berikut, tergantung pada apa aplikasi jaringan lainnya dan sambungan terbuka ketika anda mengeluarkan perintah.
  4. Apa perbedaan di antara output netstat dan perintah netstat-n?
    Jawaban: Tanpa n-opsi, alamat IP yang memutuskan untuk host nama, dan nomor protokol yang dikonversi ke nama protokol.
  5. Tulis entri koneksi untuk alamat IP klien dan alamat IP dari www.cisco.com yang
    web server. alamat IP lokal klien dan nomor port: Luar Negeri Alamat IP dan nomor port:
  6. Apakah entri netstat ada lebih kedua kalinya? Jawaban: Mungkin ya
Langkah 5: Tentukan diterjemahkan alamat
Gunakan informasi yang dicatat dalam langkah 2 dan 4 dan diagram topologi yang ditampilkan pada awal lab untuk mengisi Alamat: kolom Port.
Langkah 6: Refleksi
  1. Alamat port translation (PAT) juga disebut dengan NAT overload. Apakah yang “overload” Istilah lihat untuk? Jawaban: Menggunakan satu “kelebihan beban” alamat eksternal untuk menerjemahkan untuk alamat internal beberapa.
  2. NAT terminologi yang digunakan dalam laboratorium mencakup empat jenis alamat: di-lokal, di dalam-global, luar-lokal, dan luar-global. Dalam banyak hubungan yang melalui router NAT, dua dari alamat sering sama. Yang dua dari empat alamat biasanya tetap tidak berubah, dan mengapa Anda berpikir bahwa ini terjadi?
    Jawaban: Luar lokal dan luar global, karena alamat IP di luar atau tujuan harus tetap
    yang sama untuk host internal untuk dapat mencapai host yang lain di Internet.

CCNA 2 Labskill 4.1.5

Instructor version

Objective
  • • Create an IP addressing plan for a small network.

Background / Preparation
In this activity, you will play the role of an onsite installation and support technician from an ISP. A customer has called the ISP complaining of e-mail problems and occasional poor Internet performance. On The ISP is preparing a design for a network upgrade. The interim topology diagram for the proposed network is shown below.
There is still a requirement for an IP addressing plan. One of the ISP network designers has made some
notes on a simplified sketch of the proposed network, and has written some requirements. The designer asks you to create an IP address plan for the network upgrade.

Step 1: Analyze the network
  1. perhitungkanlah berapa minimal subnet host yang dibutuhkan:
  1. 30 hosts
  2. 5 bits
  1. S ubnet terbesar harus dapat mendukung host yaitu 3 subnets
  2. Ya

Step 2: Calculate the custom subnet mask
Langkah 2: Hitung subnet mask custom
Sekarang jumlah bit subnet ID diketahui, subnet mask dapat dihitung. Sebuah jaringan kelas C memiliki
default subnet mask dari 24 bit, atau 255.255.255.0. Apa yang akan subnet mask custom bisa?
Subnet mask kustom untuk jaringan ini akan menjadi  255.255.255.224 atau / 27

Step 3: Specify the host IP addresses
Langkah 3: Tentukan alamat IP host
Sekarang subnet mask diidentifikasi, skema pengalamatan jaringan dapat dibuat. Pengalamatan
skema termasuk nomor subnet, alamat broadcast subnet, dan kisaran alamat IP
dialihkan ke host.
  1. Lengkapi tabel yang menunjukkan semua subnet yang mungkin untuk jaringan 192.168.1.0.
Step 4 Consider other subnetting options
Bagaimana jika ada lebih dari 30 host yang harus didukung pada porsi baik kabel atau nirkabel
jaringan. Anda bisa meminjam lebih sedikit bit, yang akan membuat subnet yang lebih sedikit, namun masing-masing akan mendukung besar jumlah host per subnet.
  1. Berapa banyak bit akan dipinjam untuk membuat empat subnet? Jawaban 2 bit (2 ^ 2 = 4 subnet)
  2. Berapa banyak bit akan ditinggalkan untuk host pada subnet masing-masing? Jawanban 6 bit
  3. Berapa jumlah maksimum host setiap subnet dapat mendukung? 2 ^ 6 = 64-2 = 62
  4. Apa yang akan subnet mask dalam desimal bertitik dan nomor slash (/ #) format?
    Pinjaman 2 bit akan membuat 255.255.255.192 atau / 26 subnet mask.
  5. Jika Anda mulai dengan jaringan 192.168.1.0 yang sama seperti sebelumnya dan subnet ke empat subnet, apa yang akan nomor subjaringan? 192.168.1.0, 192.168.1.64, 192.168.1.128, 192.168.1.192
Step 5: Reflection
  1. Apakah subnetting membantu mengurangi masalah deplesi alamat IP? Jelaskan jawaban Anda. jawaban: Ya. Subnetting mengizinkan kita untuk menggunakan satu alamat kelas C untuk mendukung berbagai jaringan.
  2. Rough Desain Diagram Catatan mencatat bahwa subnet nirkabel akan memiliki hingga 30 PC
    menghubungkan. Dalam berpasangan atau dalam kelompok kecil, berdiskusi maupun tidak yang menciptakan situasi di mana IP alamat mungkin akan sia-sia. Apakah itu penting, dan mengapa atau mengapa tidak?
  3. Ada metode alternatif dari subnetting dengan CIDR dan VLSM. Apakah VLSM menjadi berharga pilihan untuk subnetting jaringan ini? Diskusikan dalam kelompok kecil

CCNA 2 Labskill 3.2.4

Lab 3.2.4.2 Evaluating a Cabling Upgrade  Plan
Objectives
•  Examine the existing floor plan of a customer.
•  Propose a cable upgrade plan to accommodate extra floor space.
Background / Preparation
A medium sized company has existing space on the second floor of an office tower and has  just acquired the rest of the second floor. They have  asked you to examine their existing floor plan and assist the the placement of a new IDF, placement of cables to support all of the new office space, and to help determine  if any new devices are required. This lab can be done individually or in groups. The following resources are required:
•  Existing Floor Plan (provided)
Step 1: Examine the existing floor plan
a .  From the information provided on the existing floor plan, label the following items:
1) POP –Point of Presence
2) MDF – Main Distribution Facility
3  IDF – Intermediate Distribution Facility
4) vertical/Backbone Cabling
5 )Horizontal Cabling
b . What type of cabling could be used for the vertical/back bone cabling? Explain your answer
Jawab:
Kabel yang digunakan ialah vertical backbone cable, alasannya karena jaringan yang akan dibangun terletak pada lantai dua dan jika dianalogikan posisi masing masing device kerja atau bagian kerja akan bersimpangan. Oleh karena itu kabel yang digunakan ialah vertical backbone cable dangan sambungan vertical patch panel.
Step 2 :Evaluate plan for new floor space.
Any Company  has just  merged  with a small web design group and has acquired the remaining space on the second floor  to accommodate the web design team .  This  new space is represented on the diagram as the floor  space highlighted on the right side of the floor  plan.  It has been decided to add a second IDF to  support the work stations in the new area.
  1. Suggest a possible  location for the new IDF . What room / location did you choose and explain why you think it is suitable?
Jawab:
Ruangan / lokasi yang cocok untuk memasang IDF baru ialah pada telecommunication room . karena IDF sebagai fasilitas pendistribusi merupakan perangkat yang harus tersusun dengan perangkat server.
b . What type of cable would you suggest for the vertical cabling required to connect the new IDF to the existing MDF? Explain your reasons
Jawab:
Jenis cable yang digunakan untuk menghubungkan IDF dan MDF adalah Horizontal Cabling, alasannya IDF dan MDF dihubungkan untuk langsung terkoneksi ke area kerja (work area) sehingga harus menggunakan cabel horizontal.
c. The new space contains mostly offices.  Assume that each office will be provisioned with 2 data drops. Also plan for 2 drops  in the auditorium to support Internet access for presentations and training sessions. How many additional data drops need to be ordered?
Jawab:
Dibutuhkan dua data drops lagi.
d . You have been asked to determine the number of  new 24 port switches required for the new IDF. Remember to plan on approximately 25% growth. How many new switches will Company ABC need to purchase?
Jawa:
Banyaknya switch yang dibutuhkan dengan perkembangan perusahaan yang dianalisa 25% adalah 60 buah switch dengan perhitungan. Masing – masing lantai terdiri dari 24 switch dan perlutambahan untuk perkembangan sebanyak 6 buah  = 24 x 2 = 48
+ 12 = 60 buah switch
e . How many horizontal cables will terminate on patch panels in the new IDF?
Jawaban = sebanyak 32  buah kabel horizontal, termasuk pada telecommunications room.
Step3: Examine the floor space and wiring plan.
a .  What equipment other than switches would you expect to find in the new IDF?
Jawab:
Horizontal cable, switch,hub
b .  What equipment other than switches would you expect to find in the MDF?
Jawab:
Vertical cable,router.
c    Using existing cable runs, could you use UTP to connect the devices  in room 2.20 or 2 .30 directly into a switch in the MDF?
Jawab:
Ya, bisa dapat langsung digunakan.
Step 4 . Reflection
a .  Is  it better to have an IDF in this floor space or should the company run the horizontal cables for each device directly back to the existing MDF?
Jawab:
Lebih baik menggukan IDF dengan koneksi kabel horizontal untuk terhubung sebagai mediator untuk distribusi.
b. How many cables will be required from the MDF to the IDF to support the switches? Explain your answer
jawab:
3 buah kabel, alasannya setelah terkoneksi dengan router, dibutuhkan 3 lagi alat berupa repeater. Maka agar alat itu bisa digunakan dibutuhkan 3 lagi kabel horizontal.

CCNA 2 Labskill 1.2.3

Lab 1.2.3 Mapping ISP Connectivity Using Traceroute
Objectives
•Run the Windows tracert utility from a local host computer to a website on a different continent.
• Interpret the traceroute output to determine which ISPs the packets passed through on their way from the local host to the destination website.
• Draw a diagram of the traceroute path, showing the routers and ISP clouds passed through from the local host to the destination website, including IP addresses for each device.
Background / Preparation
In this activity, you will use the Windows tracert utility to map Internet connectivity between your local ISP and the other ISPs that it uses to provide global Internet access. You will also map connectivity to the following major Regional Internet Registries (RIRs). However, your instructor may choose different destination websites. 
•  AfriNIC (African Network Information Centre) – Africa Region
•  APNIC (Asia Pacific Network Information Centre) – Asia/Pacific Region
•  ARIN (American Registry for Internet Numbers) – North America Region
•  LACNIC (Regional Latin-American and Caribbean IP Address Registry) – Latin America and some Caribbean Islands
•  RIPE NCC (Réseaux IP Européens) – Europe, the Middle East, and Central Asia
This activity can be done individually, in pairs, or in teams. It can be done as an in-class activity or as a homework assignment, depending on whether the classroom computers have access to the Internet.  The following resources are required:
•  Host computer with the Windows operating system
•  Access to the command prompt
• Internet connection
•  Routes Traced worksheet for each destination URL. The worksheet is attached to this lab. Each student completes their own worksheets and gives them to the instructor.
•  Global Connectivity Map, which is attached at the end of this lab
•  Access to the PC command prompt
Step 1: Run the tracert utility from a host computer
a. Verify that the host computer has a connection to the Internet.
b. Open a Command Prompt window by clicking Start > Run and typing cmd. Alternatively, you may click Start > All programs > Accessories > Command Prompt.
c.  At the prompt, type tracert and your first destination website. The output should look similar to the following:
d. Save the tracert output in a text file as follows:
1)  Right-click the title bar of the Command Prompt window and choose Edit > Select All.
2)  Right-click the title bar of the Command Prompt window again and choose Edit > Copy.
3) Open the Windows Notepad program: Start > All Programs > Accessories > Notepad.
4)  To paste the output into Notepad, choose Edit > Paste.
5) Choose File > Save As and save the Notepad file to your desktop as tracert1.txt.
e. Run tracert for each destination website and save the output in sequentially numbered files.
f. Run tracert from a different computer network, for example, from the public library or from a friend’s computer that accesses the Internet using a different ISP (for instance, cable instead of DSL). Save a copy of that output in Notepad and print it out for later reference.
Step 2: Interpret tracert outputs to determine ISP connectivity
Routes traced may go through many hops and a number of different ISPs depending on the size of your ISP and the location of the source and destination hosts. In the example output shown below, the tracert packets travel from the source PC to the local router default gateway to the ISPs Point of Presence (POP) router and then to an Internet Exchange Point (IXP). From there they pass through two Tier 2 ISP routers and then though several Tier 1 ISP routers as they move across the Internet backbone. When they leave the Tier 1 ISPs backbone, they move through another Tier 2 ISP on the way to the destination server at
www.ripe.net.
a.  Open the first traceroute output file and answer the following questions.
1)  What is the IP address of your local POP router?
Jawab:
Ip address dari local POP Router adalah 192.168.190.5
2)  How many hops did the traceroute packet take on its journey from the host computer to the
destination?
Jawab:
Pengambilan paket data selama proses pada tracert ada sebanyak 16 kali
3)  How many different ISPs did the traceroute packet pass through on its journey from the host
computer to the destination?
Jawab:
Jumlah tracert melewati isp yang berbeda untuk sampai ketujuan ada sebanyak 5 kali adapun alamat alamat tujuan
  1. if-1-0-0-1980.mcore3.laa-losangeles.as6453.net [66.110.59.18]
  2. ix-10-0-0-0.tcore1.lvw-losangeles.as6453.net [216.6.84.49]
  3. if-10-0.core3.nto-newyork.as6453.net [216.6.57.66]
  4. if-7-0-0.core2.ad1-amsterdam.as6453.net [80.231.81.45]
  5. if-4-0.mcore3.njy-newark.as6453.net [216.6.84.2]
4)  List the IP addresses and URLs of all the devices in the traceroute output in the order that they appear on the Routes Traced worksheet.
5)  In the Network Owner column of the worksheet, identify which ISP owns each router. If the router belongs to your LAN, write “LAN”. The last two parts of the URL indicates the ISP name. For example, a router that has “sprint.net” in its URL belongs to the network of an ISP called Sprint.
6)  Did the traceroute pass through an unidentified router between two ISPs? This might be an IXP. Run the whois command utility or whois function of a visual traceroute program to identify ownership of that router. Alternatively, go to http://www.arin.net/whois to determine to whom the IP is assigned.
b.  Complete the worksheet using the traceroute output file for each of the other destination URLs.
c.  Compare your results from the different traceroute output files. Did your ISP connect to different ISPs to reach different destinations?
Jawab:
Ya, pada kasus melakukan tracert ke http://whois.arin.net/ui isp nya masing masing protocol yang berbeda salaing terkoneksi untuk mencapai tujuan yaitu hit-nxdomain.opends.com [67.215.65.132]
Dan adapun ISP yang berbeda untuk saling terkoneksi adalah
  1. xe-1-0-0.r21.newthk02.hk.bb.gin.ntt.net [129.250.3.206]
  2. p64-4-1-1.r21.tokyjp01.jp.bb.gin.ntt.net [129.250.3.1]
  3. as-0.r21.Isanca03.us.bb.gin.ntt.net [192.250.6.4]
d.  If you ran a traceroute from a different computer network, check the output for that traceroute file as well. Was the number of hops different to reach the same destination from different local ISPs? Which ISP was able to reach the destination in fewer hops?
Jawab:
Jumlah HOP untuk mencapai destination pada sebuah alamat tracert yang dituju akan tetap sama. Meskipun telah dilakukan beberapa kali test tracert akan memunculkan jumlah list hop yang sama. Maka ISP yang membutuhkan sedikit hop untuk mencapai tujuannya adalah ISP B (cable service provider)
Step 3: Map the connectivity of your ISP
a.  For each traceroute output, draw a diagram on a separate sheet of paper showing how your local ISP interconnects with other ISPs to reach the destination URL, as follows:
1)  Show all of the devices in sequence from the LAN router to the destination website server. Label all of the devices with their IP addresses.
2)  Draw a box around the local POP router that you identified, and label the box “POP”.
3)  Draw an ISP cloud around all the routers that belong to each ISP, and label the cloud with the ISP name.
4)  Draw a box around any IXP routers that you identified, and label the box “IXP”.
b.  Use the Global Connectivity Map to create a combined drawing showing only ISP clouds and IXP boxes.
Worksheet for Routes Traced
Destination URL: www.ripe.net [193.0.6.139]          Total Number of Hops: 16
Router IP Address Router URL(if any) Network Owner(LAN, Name of ISP or IXP)
192.168.190.5
ns4.unp.ac.id
192.168.37.9 58.26.87.109 tm.net.my
66.110.59.18
losangeles.as6453.net
216.6.84.49
losangeles.as6453.net
216.6.84.2
njy-newark.as6453.net
216.6.57.66
nto-newyork.as6453.net
80.231.81.45
ad1-amsterdam.as6453.net
80.231.81.18
ad1-amsterdam.as6453.net
195.219.150.70
ad1-amsterdam.as6453.net
195.69.144.68
gw.amsix.nikrtr.ripe.net
193.0.6.139
www.ripe.net

CCNA 1 labskill 9.2.7

Lab 9.2.7 Troubleshooting Using Network Utilities
Objectives
  • Use network utilities and the integrated router GUI to determine device configurations.
  • Select the appropriate network utilities to help troubleshoot connectivity problems.
  • Diagnose accessibility problems with Web, FTP, Telnet, and DNS servers.
  • Identify and correct physical problems related to cable types and connections.
Background / Preparation
In this lab, you use the browser and various troubleshooting utilities, such as ipconfig, ping, tracert, netstat,and nslookup to diagnose and correct connectivity problems. These command line interface (CLI) utilities are available on most current operating systems, although the exact command and syntax may vary. Windows XP commands and syntax are used in this lab.
Your instructor will set up the network topology similar to the one shown here and will preconfigure the client computer, integrated router, server, and external router for each scenario in the lab. Various software and hardware connectivity problems will be introduced, and you will diagnose the cause from the client computer. This lab requires setup by the instructor to create various connectivity problems, mainly by enabling and disabling services, disconnecting cables, or using the wrong type of cable (straight-through or crossover). The troubleshooting environment must contain a server with Web, FTP, Telnet, and DNS services installed. The DNS server must be able to resolve the names of the other servers to a common IP address.
The integrated router is both a DHCP client and server and must pass IP address, subnet mask, default gateway, and DNS server information to the client. The internal address should be 192.168.1.x/24, and the external addresses can be determined by the instructor. The external router is configured as a DHCP server to give the integrated router client its IP configuration. The external server should have a static IP configuration. Students have access to the Host-A command line and integrated router GUI, but do not have access to the router or server CLI or GUI.
Problem Scenarios:
1)     Web server software disabled, but physical connectivity to server present.
2)     Web server software enabled and physical connectivity present, but DNS server has incorrect name/address resolution.
3)     FTP server software enabled but physical connection to server not present.
4)     FTP server software enabled and physical connection present, but local host not configured as DHCP client.
5)     Telnet server software enabled, but wrong cable type used to connect the server to the router.
6)     All server software enabled (Web, FTP, Telnet, and DNS) and connections present. Check TCP connections.
There are six scenarios. Work in teams of three, with each person taking the lead in two of the scenarios, and the other team members assisting. The following resources are required:
  • Computer running Windows XP Professional with Web, FTP, and Telnet clients (CLI or GUI).
  • Server running a combination of DNS, HTTP, FTP, and Telnet services (preconfigured). This server will simulate Internet connections and can be a server with these services actually installed and running or a server running the Discovery Live CD.
  • Integrated router configured as a DHCP server and client (default configuration).
  • Router with two Ethernet interfaces configured as a DHCP server to integrated router (preconfigured).
  • Ethernet Cat-5 (minimum) straight and crossover cabling to connect hosts and network devices.
Step 1: Build the network and configure the hosts
  1. Have your instructor set up a network topology similar to the one shown with the Host-A client computer, integrated router, server, and router preconfigured.
  2. Work from Host-A to issue commands to troubleshoot problems introduced by the instructor.
  3. All commands are issued from a command prompt window. Open a command prompt window by clicking Start > All Programs > Accessories > Command Prompt. Keep the window open for the duration of the lab.
Step 2: Record the baseline IP address information for computers and integrated router
NOTE: Perform this step before the instructor introduces problems.
  1. Host-A configuration—Issue the command that displays the IP address information for Host-A, including the DNS server, and record the information below. Which command did you use? __________________ ipconfig /all
IP address: ________________________________ May vary – 192.168.1.x
Subnet mask: ______________________________ 255.255.255.0
Default gateway IP address: __________________ May vary – 192.168.1.1
DNS server IP address: ______________________ Will vary – IP address of Server set by instructor
DHCP server IP address: _____________________ May vary – 192.168.1.1
How did Host-A obtain its IP address? ___________ DHCP from integrated router
  1. Integrated router configuration—From Host-A, open a browser and go to the integrated router GUI by entering 192.168.1.1 as the URL address. Log in to the integrated router using the default user ID and password (check with your instructor if necessary). Check the internal and external IP address information and record it below.
Internal IP address: _________________________ Setup > Basic Setup – 192.168.1.1
Subnet mask: ______________________________ 255.255.255.0
Is the DHCP server enabled? __________________ Yes assigned by DHCP server of Router – Set by instructor
Subnet mask: ______________________________ Will vary – Assigned by DHCP server from
Router – Set by instructor
Default gateway IP address: __________________ Will vary – IP address of next hop interface on Router – Set by instructor
DNS server IP address: ______________________ Will vary – IP address of Server – Set by
instructor
  1. Server configuration—Obtain the Server IP configuration from your instructor and record the information below.
IP address: ________________________________ Will vary – Static set by instructor
Subnet mask: ______________________________ Will vary – Static set by instructor
Default gateway IP address: __________________ Will vary – Static set by instructor – IP address of next hop interface on Router
Web Server 1 protocol and name: ________________________ (May vary – Live CD server name is http://server-1.discovery.ccna
Web Server 2 protocol and name: ________________________ (May vary – Live CD server name is http://server-1.discovery.ccna
FTP Server 1 protocol and name: ________________________ (May vary – Live CD server name is http://server-1.discovery.ccna
FTP Server 2 protocol and name: ________________________ (May vary – Live CD server name is          http://server-1.discovery.ccna
Step 3: Scenario 1—Diagnose Web server access
  1. After your instructor sets up the problem for this scenario, use various utilities to diagnose the problem.
  2. Open your browser and enter the name of the Web Server 1 from Step 2. What happened?…. Host-A is unable to reach the server website
  3. Which commands did you use to diagnose the problem? ….Browse by name and IP fails; 2. Ping server by name succeeds
  4. Report the problem or suspected problem to the instructor. What was the problem? Problem: Web server software was disabled. Network connectivity tested good. DNS is working. Must be problem with the HTTP server
  5. What did you do to correct the problem, if anything? Nothing student can do but report suspected problem to instructor to start HTTP server
  6. You may need to contact the instructor to correct the problem. When the problem is corrected, retest and verify access to the server.

Step 4: Scenario 2—Diagnose Web server access
  1. After your instructor sets up the problem for this scenario, use various utilities to diagnose the problem.
  2. Open your browser and enter the name of the Web Server 2 from Step 2. What happened? Host-A is unable to reach the server website
  3. Which commands did you use to diagnose the problem? 1. Browse by name fails. 2. Browse by IP succeeds. 3. Ping by name fails. 4. Ping by IP succeeds. nslookup for http://server-2.discovery.ccna reveals that the server name is associated with the wrong IP address
  4. Report the problem or suspected problem to the instructor. What was the problem? Web server software enabled and physical connectivity present, but DNS server has incorrect name/address resolution Browser can get to web server by IP but not by name. Network connectivity tested good. Suspected DNS server could be down, but nslookup discovered bad entry in DNS table
  5. What did you do to correct the problem, if anything? Nothing student can do but report suspected problem to instructor, or student can browse to http://server-1.discovery.ccna, which resolves to the correct IP address. If DNS is running stale information, solution could be to wait for information to expire and then flush tables (not possible without admin access) or redirect client to another name server
  6. You may need to contact the instructor to correct the problem. When the problem is corrected, retest and verify access to the server.
Step 5: Scenario 3—Diagnose FTP server access
  1. After your instructor sets up the problem for scenario, use various utilities to diagnose the problem.
  2. Use your FTP client (CLI or GUI) to connect to FTP Server 1 from Step 2. What happened? …… Host-A is unable to reach the FTP site
  3. Which commands did you use to diagnose the problem? 1. FTP client to server by name fails. 2. FTP client by IP fails. 3. Ping to server by name or IP fails. 4. Ipconfig on Host-A shows correct IP info. Tracert to server fails at router connected to server.
  4. Report the problem or suspected problem to the instructor. What was the problem? FTP server software enabled, but physical connection to server not present FTP and ping network connectivity testing failed. Host-A IP config is OK. Traceroute indicated problem at router connected to server. Visual inspection reveals cable to server NIC is disconnected
  5. What did you do to correct the problem, if anything?  ……Connect cable to server NIC and retest to verify that this is the only problem
  6. You may need to contact the instructor to correct the problem. When the problem is corrected, retest and verify access to the server.
Step 6: Scenario 4—Diagnose FTP server access
  1. After your instructor sets up the problem for this scenario, use various utilities to diagnose the problem.
  2. Use your FTP client (CLI or GUI) to connect to FTP Server 2 from Step 2. What happened? ….. Host-A is unable to reach the server FTP site
  3. Which commands did you use to diagnose the problem? …. 1. FTP client to server by name fails. 2. FTP client by IP fails. 3. Ping to server by name or IP fails. 4. Ping to default gateway (integrated router internal address) fails. 5. Ipconfig on Host-A shows incorrect static IP info. 6. Tracert fails at integrated router
  4. Report the problem or suspected problem to the instructor. What was the problem?…. Problem: FTP server software enabled and physical connection present, but local host has wrong static IP address and not configured as DHCP client FTP and ping to server testing failed. The ipconfig command indicated that Host-A had noncompatibl static address. Host-A should be a DHCP client
  5. What did you do to correct the problem, if anything? Configure Host-A as DHCP client, and retest to verify that this is the only problem
  6. You may need to contact the instructor to correct the problem. When the problem is corrected, retest and verify access to the server.
Step 7: Scenario 5—Diagnose Telnet server access problem
  1. After your instructor sets up the problem for this scenario, use various utilities to diagnose the problem.
  2. Use a Telnet client (CLI or GUI) to connect to the name of Server 1 identified in Step 2. What happened?…………………….. Host-A is unable to reach the Telnet server
  3. Which commands did you use to diagnose the problem? ……………….1. Telnet client to server by name fails. 2. Telnet client to server by IP fails. 3. Ping to server by name or IP fails. 4. Ping to default gateway (integrated router internal address) succeeds. 5. Ipconfig on Host-A shows correct IP info. Tracert to server fails at router connected to server
  4. Report the problem or suspected problem to the instructor. What was the problem? Problem: Telnet server software enabled, but the wrong cable type (straight-through) used to connect the server. Server NIC and router interface are both hosts and are considered to be like devices. Should be a crossover instead of a straight-through cable, because there is no switch or hub in between Telnet and ping to server testing failed. Host-A IP config is OK and Host-A can ping its default gateway. Traceroute indicated problem at router connected to server. Visual inspection reveals cable to server NIC is wrong type
  5. What did you do to correct the problem, if anything? ……….. Replace the straight-through cable from server to router with a crossover cable and retest
  6. You may need to contact the instructor to correct the problem. When the problem is corrected, retest and verify access to the server.
Step 8: Scenario 6—Analyze TCP connections to Host-A
  1. Ask your instructor to verify that all problems introduced with the lab setup have been corrected. Using the appropriate clients, connect to the Web, FTP, and Telnet servers simultaneously from Host-A.
  2. From the command line, issue a command to display the current active TCP connections to Host-A with names of the servers and protocols. Which command did you use? netstat
  3. Which named connections did you see? HTTP, FTP, Telnet, and possibly others
  4. From the command line, issue a command to display the current active TCP connections to Host-A with IP addresses and protocol port numbers. Which command did you use?  netstat -n
  5. Which IP addresses and port numbers did you see? Should see the foreign IP address of the server and ports 80 (HTTP), 21 (FTP), 23 (Telnet), and possibly others.
  6. From the command line, issue a command to display the current active TCP connections to Host-A, along with the program that created the connection. Which command did you use? ……netstat -b
  7. Which program executable (filename with an .exe extension) is listed for each of the connections? ……….Executables for each client (GUI or CLI) used to initiate the connection: iexplore.exe, ws-ftp.exe, ftp.exe, telnet.exe, and so on.
Step 9: Reflection
  1. When troubleshooting the problem scenarios during this lab, which troubleshooting technique did you use primarily (top-down, bottom-up, or divide and conquer)?……..Answers will vary – Mostly top-down
  2. Which utility or command do you feel was the most useful for network troubleshooting? …..Answers will vary – probably ping

CCNA 1 labskill 8.4.3

Lab 8.4.3 Performing a Vulnerability Analysis
CAUTION: This lab may violate legal and organizational security policies. The security analyzer downloaded in this lab should only be used for instructional purposes in a lab environment. Before using a security analyzer on a live network, check with your instructor and network administration staff regarding internal policies concerning the use of these tools.
Objectives
  • Download and install security analyzer software.
  • Test a host to determine potential security vulnerabilities.
Background / Preparation
Security analyzers are valuable tools used by network administrators and auditors to identify network and
host vulnerabilities. There are many vulnerability analysis tools, also known as security scanners, available to test host and network security. In this lab, you will download and install the Microsoft Baseline Security Analyzer (MBSA). MBSA is designed to identify potential security issues related specifically to Microsoft operating systems, updates, and applications. It also identifies unnecessary services that may be running, as well as any open ports. MBSA runs on Windows Server and Windows XP systems and scans for common security misconfigurations and missing security updates for the operating system as well as most versions of Internet Information Server (IIS), SQL Server, Internet Explorer (IE), and Office products. MBSA offers specific recommendations to correct potential problems. This lab can be done individually or in teams of two. The following resources are required:
  • Computer running Windows XP Professional to act as the test station.
  • High-speed Internet connection for downloading MBSA (unless pre-installed).
  • Computer must be attached to the integrated router switch or a standalone hub or switch.
  • Optionally, you can have a server running a combination of DHCP, HTTP, FTP, and Telnet (preconfigured).
Step 1: Download and install MBSA
  1. Open a browser and go to the MBSA web page at: http://www.microsoft.com/technet/security/tools/mbsa2/default.mspx Jawab :
  • Command-line and Graphical User Interface (GUI) options
  • Scan local computer, remote computer, or groups of computer
  • Scan against Microsoft’s maintained list of updates (on Microsoft.com) or local server running Software Update Services 1.0
  • Scan for common security configuration vulnerabilitie
  • Scan for missing security updates
  • View reports in MBSA Graphical User Interface or Command Line Interface
  • Compatibility with SMS 2.0 and 2003 Software Update Services Feature Pac
  • Support for single processor and multiprocessor configurations
  • Localized to English, French, German, and Japanese although MBSA 1.2.1 can scan a machine of any local
  1. What is the latest version of MBSA available Answers will vary. Currently 2.0.1
  2. What are some of the features MBSA provides?  Answers will vary – From website: “detect common security misconfigurations and missing security updates on your computer systems”
  3. Scroll down the page and select the desired language to begin the download process.
  4. Click Continue to validate the copy of Microsoft Windows you are running.
  5. Click Download Files below and select the file you want to download. (The English setup file is MBSASetup-EN.msi). Click the Download button on the right of this file. How many megabytes is the file to download?  Answers will vary, approximately. Jawab : 11,5 MB
  6. When the File Download – Security Warning dialog box displays, click Save and download the file to a specified folder or the desktop. You can also run it from the download website.
  7. Once the download is complete, make sure all other applications are closed. Double-click the downloaded file. Click Run to start the Setup program, and then click Run if you are prompted with a Security Warning. Click Next on the MBSA Setup screen.
  8. Select the radio button to accept the license agreement and click Next. Accept the defaults as the install progresses, and then click Finish. Click OK on the final MBSA Setup screen, and close the folder to return to the Windows desktop.
Step 2: Build the network and configure the hosts
  1. Connect the host computer(s) to the integrated router, a hub, or a switch as shown in the topology diagram. Host-A is the test station where MBSA will be installed. The server is optional.
  2. Set the IP configuration for the host(s) using Windows XP Network Connections and TCP/IP properties. If the host is connected to the integrated router, configure it as a DHCP client; otherwise go to Step 1d.
  3. If the host is connected to a hub or switch and a DHCP server is not available, configure it manually by assigning a static IP address.
Which IP address and subnet mask does Host-A and the server (optional) have? Answer will vary – 192.168.1.X and 255.255.255.0. Default gateway is not required but could be set to 192.168.1.1 (the default IP address of the integrated router, if present).
Jawab :   IP Address : 192.168.24.09
Subnet Mask : 255.255.255.0

Step 3: Run MBSA on a host
  1. Double-click the desktop icon for MBSA or run it from Start > All Programs. When the main screen displays, which options are available? Scan a computer, Scan more than one computer, and View existing security reports.
Jawab :
    • Pick a computer to scan
    • Pick multiple computer to scan
    • Pick a security report to view
    • Help
    • About
    • Microsoft Security Web Site
Step 4: Select a computer to scan
  1. On the left side of the screen, click Pick a computer to scan. The computer shown as the default is the one on which MBSA is installed.
  2. What are the two ways to specify a computer to be scanned?  By name and by IP address.
  3. Accept the default computer to be scanned. De-select Check for IIS and SQL administrative vulnerabilities, since these services are not likely to be installed on the computer being scanned. Click Start Scan.
Step 5: View security update scan results
  1. View the security report. What are the results of the security update scan? Answer will vary. See screen below for possibilities. Missing Security Updates are indicated by a red X in the Score column. Missing Update Rollups and Service Packs are indicated by a yellow X
  2. If there are any red or yellow Xs, click How to correct this. Which solution is recommended? Answer will vary – Most often to download updates and service packs from Microsoft Update website

Step 6: View Windows scan results in the security report
  1. Scroll down to view the second section of the report that shows Windows Scan Results. Were there any administrative vulnerabilities identified? Answers will vary. See screen below for some possibilities
  2. On the Additional System Information section of the screen (below), in the Issue column for Services, click What was scanned, and click Result details under the Result column to get a description of the check that was run. What did you find? When finished, close both popup windows to return to the security report. … ..Answers will vary. Telnet and some other services may be installed and running. Port numbers will be listed
Step 7: View Desktop Application Scan Results in the Security report
  1. Scroll down to view the last section of the report that shows Desktop Applications Scan Results. Were there any administrative vulnerabilities identified? Answers will vary. See screen below for some possibilities.
  2. How many Microsoft Office products are installed? Answers will vary
  3. Were there any security issues with Macro Security for any of them? Answers will vary
Step 8: Scan a server, if available
  1. If a server with various services is available, click Pick a computer to scan from the main MBSA screen and enter the IP address of the server, and then click Start Scan. Which security vulnerabilities were identified?                                                                                           Answers will vary depending on the server. This can be a live server if the host has physical and logical access to it and organizational policies permit scanning the live network
  2. Were there any potentially unnecessary services installed? Which port numbers were they on?                                                                  Answers will vary depending on the server. Could include Telnet, HTTP, FTP, and so on, with corresponding port numbers
Step 9: Uninstall MBSA using Control Panel Add/Remove Programs
  1. This step is optional, depending on whether the host will be automatically restored later by a network process.
  2. To uninstall MBSA, click Start > Control Panel > Add/Remove Programs. Locate the MBSA application and uninstall it. It should be listed as Microsoft Baseline Security Analyzer 2.0.1. Click Remove, and then click Yes to confirm removal of the MBSA application. When finished, close all windows to return to the desktop.

Step 10: Reflection
  1. The MBSA tool is designed to identify vulnerabilities for Windows-based computers. Search the Internet for other tools that might exist. List some of the tools discovered. Answers will vary.
Jawab :
  • Client versions of Windows, including Windows
  • Windows Server, including Windows Server 2008
  • SQL Server
  • Internet Information Server (IIS)
  • Internet Explorer
  • Microsoft Office
  1. Which tools might there be for non-Windows computers? Search the Internet for other tools that might exist and list some of them here. Answers will vary.
  2. Which other steps could you take to help secure a computer against Internet attacks? Answers will vary

CCNA 1 Labskill 8.4.2

Lab 8.4.2 Configuring Access Policies and DMZ Settings
Objectives
  • Log in to a multi-function device and view security settings.
  • Set up Internet access policies based on IP address and application.
  • Set up a DMZ for an open access server with a static IP address.
  • Set up port forwarding to limit port accessibility to only HTTP.
  • Use the Linksys WRT300N Help features.
Background / Preparation
This lab provides instructions for configuring security settings for the Linksys WRT300N. The Linksys provides a software-based firewall to protect internal, local-network clients from attack by external hosts. Connections from internal hosts to external destinations can be filtered based on the IP address, destination website, and application. The Linksys can also be configured to create a demilitarized zone (DMZ) to control access to a server from external hosts. This lab is done in teams of two, and two teams can work together to test each other’s access restrictions and DMZ functionality. It is divided into 2 parts:
  • Part 1 – Configuring access policies
  • Part 2 – Configuring DMZ settings
The following resources are required:
  • Linksys WRT300N or other multi-function device with the default configuration
  • User ID and password for the Linksys device if different than the default
  • Computer running Windows XP Professional to access the Linksys GUI
  • Internal PC to act as a server in the DMZ with HTTP and Telnet servers installed (preconfigured or
  • Discovery Live CD server)
  • External server to represent the ISP and Internet (with preconfigured DHCP, HTTP, and Telnet
  • servers running (real server with services installed or Discovery Live CD server)
  • Cabling to connect the PC hosts, Linksys WRT300N or multi-function device, and switches
Part 1 – Configuring access policies
Step 1: Build the network and configure the hosts
  1. Connect the host computers to switch ports on the multi-function device as shown in the topology diagram. Host-A is the console and is used to access the Linksys GUI. Host-B is initially a test machine but later becomes the DMZ server.
  2. Configure the IP settings for both hosts using Windows XP Network Connections and TCP/IP properties. Verify that Host-A is configured as a DHCP client. Assign a static IP address to Host-B in the 192.168.1.x range with a subnet mask of 255.255.255.0. The default gateway should be the internal local network address of the Linksys device.
NOTE: If Host-B is already a DHCP client, you can reserve its current address and make it static using the DHCP Reservation feature on the Linksys Basic Setup screen.
c.   Use the ipconfig command to display the IP address, subnet mask, and default gateway for Host-A and Host-B and record them in the table. Obtain the IP address and subnet mask of the external server from the instructor and record it in the table
Host
IP Address
Subnet Mask
Default Gateway
Host A
192.168.24.9
255.255.255.0
192.168.24.1
Host-B / DMZ Server
192.168.34.9
255.255.255.0
192.168.34.1
External Server
192.168.44.9
255.255.255.0
192.168.44.1
Step 2: Log in to the user interface
  1. To access the Linksys or multi-function device web-based GUI, open a browser and enter the default internal IP address for the device, normally 192.168.1.1.
  2. Log in using the default user ID and password, or check with the instructor if they are different.
  3. The multi-function device should be configured to obtain an IP address from the external DHCP server. The default screen after logging in to the multi-function device is Setup > Basic Setup. What is the Internet connection type? Jawab : wireless internet connection
  4. What is the default router (internal) IP address and subnet mask for the multi-function device? Jawab: IP address : 192.168.1.1 Subnet mask : 255.255.255.0
  5. Verify that the multi-function device has received an external IP address from the DHCP server by clicking the Status > Router tab.
  6. What is the external IP address and subnet mask assigned to the multi-function device? Jawab: IP address : 192.168.2.1, Subnet mask : 255.255.255.0
Step 3: View multi-function device firewall settings
  1. The Linksys WRT300N provides a basic firewall that uses Network Address Translation (NAT). In addition, it provides additional firewall functionality using Stateful Packet Inspection (SPI) to detect and block unsolicited traffic from the Internet.
  2. From the main screen, click the Security tab to view the Firewall and Internet Filter status. What is the status of SPI Firewall protection? Jawab : status SPI firewall protection : enabled.
  3. Which Internet Filter checkboxes are selected? Jawab :   Internet filter yang digunakan : filter anonymous internet request, filter IDENT (port 113).
  4. Click Help to learn more about these settings. What benefits does filtering IDENT provide? Jawab: mencegah penyusup dari luar menyerang router melalui internet.
Step 4: Set up Internet access restrictions based on IP address
In Lab 7.3.5, you saw that wireless security features can be used to control which wireless client computers can access the multi-function device, based on their MAC address. This prevents unauthorized external computers from connecting to the wireless access point (AP) and gaining access to the internal local network and the Internet.
The multi-function device can also control which internal users can get out to the Internet from the local network. You can create an Internet access policy to deny or allow specific internal computers access to the Internet based on the IP address, MAC address, and other criteria.
  1. From the main multi-function device screen, click the Access Restrictions tab to define Access Policy 1.
  2. Enter Block-IP as the policy name. Select Enabled to enable the policy, and then select Deny to prevent Internet access from a specified IP address.
  3. Click the Edit List button and enter the IP address of Host-B. Click Save Settings and then Close. Click Save Settings to save Internet Access Policy 1 – Block IP.
  4. Test the policy by attempting to access the external web server from Host-B. Open a browser and enter the IP address of the external server in the address area. Are you able to access the server? Jawab : Ya.
  5. Change the status of the Block-IP Policy to Disabled and click Save Settings. Are you able to access the server now? Jawab : Tidak
  6. What other ways can access policies be used to block Internet access? Jawab: menggunakan proxy
Step 5: Set up an Internet access policy based on an application
You can create an Internet access policy to block specific computers from using certain Internet applications or protocols on the Internet.
  1. From the main Linksys GUI screen, click the Access Restrictions tab to define an Internet Access Policy.
  2. Enter Block-Telnet as the policy name. Select Enabled to enable the policy, and then click Allow to permit Internet access from a specified IP address as long as it is not one of the applications that is blocked.
  3. Click the Edit List button and enter the IP address of Host-B. Click Save Settings and then Close. What other Internet applications and protocols can be blocked?
  4. Select the Telnet application from the list of applications that can be blocked and then click the double right arrow to add it to the Blocked List. Click Save Settings.
  5. Test the policy by opening a command prompt using Start > All Programs > Accessories > Command Prompt.
  6. Ping the IP address of the external server from Host-B using the ping command. Are you able to ping the server? Ya.
  7. Telnet to the IP address of the external server from Host-B using the command telnet A.B.C.D (where A.B.C.D is the IP address of the server).
  8. Are you able to telnet to the server? No.
NOTE: If you are not going to perform lab Part 2 at this time and others will be using the equipment after you, skip to Step 3 of Part 2 and restore the multi-function device to its default settings.
Part 2 – Configuring a DMZ on the multi-function device
Step 1: Set up a simple DMZ
It is sometimes necessary to allow access to a computer from the Internet while still protecting other internal local network computers. To accomplish this, you can set up a demilitarized zone (DMZ) that allows open access to any ports and services running on the specified server. Any requests made for services to the outside address of the multi-function device will be redirected to the server specified.
  1. Host-B will act as the DMZ server and should be running HTTP and Telnet servers. Verify the Host-B has a static IP address or, if Host-B is a DHCP client, you can reserve its current address and make it static using the DHCP Reservation feature on the Linksys device Basic Setup screen.
  2. From the main Linksys GUI screen, click the Applications & Gaming tab then click DMZ.
  3. Click Help to learn more about the DMZ. For what other reasons might you want to set up a host in the DMZ? Jawab : karena DMZ berguna untuk menambahkan lapisan keamanan untuk LAN.
  4. The DMZ feature is disabled by default. Select Enabled to enable the DMZ. Leave the Source IP Address selected as Any IP Address, and enter the IP address of Host-B in the Destination IP address. Click Save Settings and click Continue when prompted.
  5. Test basic access to the DMZ server by pinging from the external server to the outside address of the multi-function device. Use the ping –a command to verify that it is actually the DMZ server responding and not the multi-function device. Are you able to ping the DMZ server? Ya.
  6. Test HTTP access to the DMZ server by opening a browser on the external server and pointing to the external IP address of the multi-function device. Try the same thing from a browser on Host-A to Host-B using the internal addresses. Are you able to access the web page? Ya.
  7. Test Telnet access by opening a command prompt as described in Step 5. Telnet to the outside IP address of the multi-function device using the command telnet A.B.C.D (where A.B.C.D is the outside address of the multi-function device).
  8. Are you able to telnet to the server? Tidak.
Step 2: Set up a host with single port forwarding
The basic DMZ hosting set up in Step 6 allows open access to all ports and services running on the server, such as HTTP, FTP, and Telnet,. If a host is to be used for a particular function, such as FTP or web services, access should be limited to the type of services provided. Single port forwarding can accomplish this and is more secure than the basic DMZ, because it only opens the ports needed. Before completing this step, disable the DMZ settings for step 1.
Host-B is the server to which ports are forwarded, but access is limited to only HTTP (web) protocol.
a.      From the main screen, click the Applications & Gaming tab, and then click Single Port Forwarding to specify applications and port numbers.
b.      Click the pull-down menu for the first entry under Application Name and select HTTP. This is the web server protocol port 80.
c.      In the first To IP Address field, enter the IP address of Host-B and select Enabled. Click Save Settings.
d.      Test HTTP access to the DMZ host by opening a browser the external server and pointing to the outside address of the multi-function device. Try the same thing from a browser on Host-A to Host-B. Are you able to access the web page?
Jawab : Ya.
e.      Test Telnet access by opening a command prompt as described in Step 5. Attempt to telnet to the outside IP address of the multi-function device using the command telnet A.B.C.D (where A.B.C.D is the outside IP address of the multi-function device).
Are you able to telnet to the server? No.
Step 3: Restore the multi-function device to its default settings
a.      To restore the Linksys to its factory default settings, click the Administration > Factory Defaults tab.
b.      Click the Restore Factory Defaults button. Any entries or changes to settings will be lost.

CCNA Discovery 3 Module 4

1. A network engineer is implementing a network design using VLSM for network 192.168.1.0/24. After subnetting the network, the engineer has decided to take one of the subnets, 192.168.1.16/28 and subnet it further to provide for point-to-point serial link addresses. What is the maximum number of subnets that can be created from the 192.168.1.16/28 subnet for serial connections? 
• 4 

2. When running NAT, what is the purpose of address overloading? 
• allow multiple inside addresses to share a single global address 

3. What two advantages does CIDR provide to a network? (Choose two.) 
• dynamic address assignment 
• reduced routing update traffic 

4. How does a router keep track of which inside local address is used when NAT overload is configured?
• The router uses TCP or UDP port numbers. 

5. What is a characteristic of a classful routing protocol on the network?  
• Updates received by a router in a different major network have the default mask applied. 

6. Refer to the exhibit. Which address is an inside global address? 
• 198.18.1.55 

7. Refer to the exhibit. All networks that are shown have a /24 prefix. Assuming that all routes have been discovered by all routers in the network, which address will successfully summarize only the networks that are shown?  
• 192.168.16.0/21 

8. What is the CIDR prefix designation that summarizes the entire reserved Class B RFC 1918 internal address range? 
• /16 

9. Which NAT term refers to the IP address of your inside host as it appears to the outside network? 
• inside local IP address  

10. A network administrator is asked to design a new addressing scheme for a corporate network. Presently, there are 500 users at the head office, 200 users at sales, 425 at manufacturing, and 50 at the research site. Which statement defines the correct VLSM addressing map with minimal waste using the 172.16.0.0/16 network?  
• 172.16.2.0/23 head office
172.16.4.0/23 manufacturing
172.16.6.0/24 sales
172.16.7.0/26 research
  

11. A company using a Class B IP addressing scheme needs as many as 100 subnetworks. Assuming that variable length subnetting is not used and all subnets require at least 300 hosts, what subnet mask is appropriate to use? 
• 255.255.254.0 

12. Host A in the exhibit is assigned the IP address 10.118.197.55/20. How many more network devices can be added to this same subnetwork? 
• 4093 

13. Refer to the exhibit. RIP version 2 is configured as the network routing protocol and all of the default parameters remain the same. Which update is sent from R2 to R3 about the 10.16.1.0/24 network connected to R1? 
• 10.16.0.0/16 

14. What range of networks are summarized by the address and mask, 192.168.32.0/19?
• 192.168.32.0/24 – 192.168.63.0/24

15. Refer to the exhibit. Based on the output of the show ip nat translations command, which kind of address translation is in effect on this router?
• overload

16. How many addresses will be available for dynamic NAT translation when a router is configured with the following commands?
• 8

17. Refer to the exhibit. Which two IP addresses could be assigned to the hosts that are shown in the exhibit? (Choose two.)
• 192.168.65.35
• 192.168.65.60


18. What are the network and broadcast addresses for host 192.168.100.130/27? (Choose two.)
• network 192.168.100.128
• broadcast 192.168.100.159

19. Refer to the exhibit. Which two are valid VLSM network addresses for the serial link between Router1 and Router2? (Choose two.)
• 192.168.1.4/30
• 192.168.1.8/30


20. When configuring NAT on a Cisco router, what is the inside local IP address?
• **c the IP address of an inside host as it appears to the inside network

Kamis, 25 November 2010

CCNA Discovery 3 Module 3

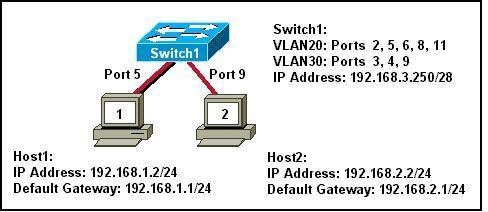
     1.
            1

Refer to the exhibit. What two statements can be concluded from the information that is shown in the exhibit? (Choose two.)
• All ports that are listed in the exhibit are access ports.
• ARP requests from Host1 will be forwarded to Host2.
• Attaching Host1 to port 3 will automatically allow communication between both hosts.
• The default gateway for each host must be changed to 192.168.3.250/28 to allow communication between both hosts.
• A router connected to the switch is needed to forward traffic between the hosts.

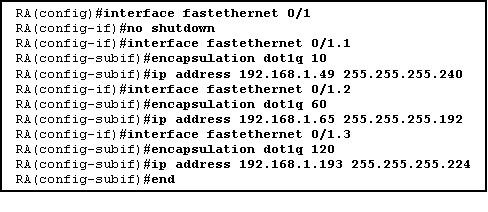
2.     
2
A router is configured to connect to a trunked uplink as shown in the exhibit. A packet is received on the FastEthernet 0/1 physical interface from VLAN 10. The packet destination address is 192.168.1.120. What will the router do with this packet?
• The router will forward the packet out interface FastEthernet 0/1.1 tagged for VLAN 10.
• The router will forward the packet out interface FastEthernet 0/1.2 tagged for VLAN 60.
• The router will forward the packet out interface FastEthernet 0/1.3 tagged for VLAN 60.
• The router will forward the packet out interface FastEthernet 0/1.3 tagged for VLAN 120.
• The router will not process the packet since the source and destination are on the same subnet.
• The router will drop the packet since no network that includes the source address is attached to the router.

3.      The information contained in a BPDU is used for which two purposes? (Choose two.)
• to prevent loops by sharing bridging tables between connected switches
• to set the duplex mode of a redundant link
• to determine the shortest path to the root bridge
• to determine which ports will forward frames as part of the spanning tree

• to activate looped paths throughout the network

4.      A router has two serial interfaces and two Fast Ethernet interfaces. This router must be connected to a WAN link and to a switch that supports four VLANs. How can this be accomplished in the most efficient and cost-effective manner to support inter-VLAN routing between the four VLANs?
• Connect a smaller router to the serial interface to handle the inter-VLAN traffic.
• Add two additional Fast Ethernet interfaces to the router to allow one VLAN per interface.
• Connect a trunked uplink from the switch to one Fast Ethernet interface on the router and create logical subinterfaces for each VLAN.
• Use serial-to-Fast Ethernet transceivers to connect two of the VLANs to the serial ports on the router. Support the other two VLANs directly to the available FastEthernet ports.

5.      When are MAC addresses removed from the CAM table?
• at regular 30 second intervals
• when a broadcast packet is received
• when the IP Address of a host is changed
• after they have been idle for a certain period of time

6.     
3

Refer to the exhibit. Switch1 is not participating in the VTP management process with the other switches. Which two are possible reasons for this? (Choose two.)
• Switch2 is in transparent mode.
• Switch1 is in client mode.
• Switch1 is using VTP version 1 and Switch2 is using VTP version 2.
• Switch2 is in server mode.
• Switch1 is in a different management domain.
• Switch1 has no VLANs.

7.      Which three must be used when a router interface is configured for VLAN trunking? (Choose three.)
• one subinterface per VLAN
• one physical interface for each subinterface
• one IP network or subnetwork for each subinterface
• one trunked link per VLAN
• a management domain for each subinterface
• a compatible trunking protocol encapsulation for each subinterface

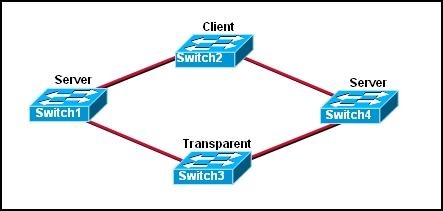
8.     
4
 
Refer to the exhibit. The switches are connected with trunks within the same VTP management domain. Each switch is labeled with its VTP mode. A new VLAN is added to Switch3. This VLAN does not show up on the other switches. What is the reason for this?
• VLANs cannot be created on transparent mode switches.
• Server mode switches neither listen to nor forward VTP messages from transparent mode switches.
• VLANs created on transparent mode switches are not included in VTP advertisements.
• There are no ports assigned to the new VLAN on the other switches.
• Transparent mode switches do not forward VTP advertisements.

9.      Which two criteria are used by STP to select a root bridge? (Choose two.)
• memory size
• bridge priority
• switching speed
• number of ports
• base MAC address
• switch location

10.  Which three steps should be taken before moving a Catalyst switch to a new VTP management domain? (Choose three.)
• Reboot the switch.
• Reset the VTP counters to allow the switch to synchronize with the other switches in the domain.

• Download the VTP database from the VTP server in the new domain.
• Configure the VTP server in the domain to recognize the BID of the new switch.
• Select the correct VTP mode and version.
• Configure the switch with the name of the new management domain.

11.  Which two items will prevent broadcasts from being sent throughout the network? (Choose two.)
• bridges
• routers
• switches
• VLANs
• hubs

12.  Which two characteristics describe a port in the STP blocking state? (Choose two.)
• provides port security
• displays a steady green light
• learns MAC addresses as BPDUs are processed
• discards data frames received from the attached segment
• receives BPDUs and directs them to the system module

13.  What is the first step in the process of convergence in a spanning tree topology?
• election of the root bridge
• determination of the designated port for each segment
• blocking of the non-designated ports
• selection of the designated trunk port
• activation of the root port for each segment

14.  In which STP state does a switch port transmit user data and learn MAC addresses?
• blocking
• learning
• disabling
• listening
• forwarding
15.  What is the purpose of VTP?
• maintaining consistency in VLAN configuration across the network
• routing frames from one VLAN to another
• routing the frames along the best path between switches
• tagging user data frames with VLAN membership information
• distributing BPDUs to maintain loop-free switched paths

16.  Which statement best describes adaptive cut-through switching?
• The switch initially forwards all traffic using cut-through switching and then changes to store-and-forward switching if errors exceed a threshold value.
• The switch initially forwards all traffic using cut-through switching and then changes to fast-forward switching if errors exceed a threshold value.

• The switch initially forwards all traffic using cut-through switching and then temporarily disables the port if errors exceed a threshold value.
• The switch initially forwards all traffic using store-and-forward switching and then changes to cut-through switching if errors exceed a threshold value.

17.  Using STP, how long does it take for a switch port to go from the blocking state to the forwarding state?
• 2 seconds
• 15 seconds
• 20 seconds
• 50 seconds
18.   
5
Refer to the exhibit. The switches are interconnected by trunked links and are configured for VTP as shown. A new VLAN is added to Switch1. Which three actions will occur? (Choose three.)
• Switch1 will not add the VLAN to its database and will pass the update to Switch 2.
• Switch2 will add the VLAN to its database and pass the update to Switch3.
• Switch3 will pass the VTP update to Switch4.

• Switch3 will add the VLAN to its database.
• Switch4 will add the VLAN to its database.
• Switch4 will not receive the update.

19.  Which Catalyst feature causes a switch port to enter the spanning-tree forwarding state immediately?
• backbonefast
• uplinkfast
• portfast
• rapid spanning tree

20.   
6
Refer to the exhibit. Which set of commands would be used on the router to provide communication between the two hosts connected to the switch?
• Router(config)# interface vlan 2
Router(config-if)# ip address 192.168.2.1 255.255.255.0
Router(config-if)# no shutdown
Router(config)# interface vlan 3
Router(config-if)# ip address 192.168.3.1 255.255.255.0
Router(config-if)# no shutdown
• Router(config)# interface fastethernet 0/0
Router(config-if)# no shutdown
Router(config-if)# interface fastethernet 0/0.2
Router(config-subif)# encapsulation dot1q 2
Router(config-subif)# ip address 192.168.2.1 255.255.255.0
Router(config-if)# interface fastethernet 0/0.3
Router(config-subif)# encapsulation dot1q 3
Router(config-subif)# ip address 192.168.3.1 255.255.255.0
• Router(config)# interface vlan 2
Router(config-if)# switchport mode trunk dot1q
Router(config)# interface vlan 3
Router(config-if)# switchport mode trunk dot1q
• Router(config)# interface fastethernet 0/0
Router(config-if)# mode trunk dot1q 2 3
Router(config-if)# ip address 192.168.2.1 255.255.255.0v